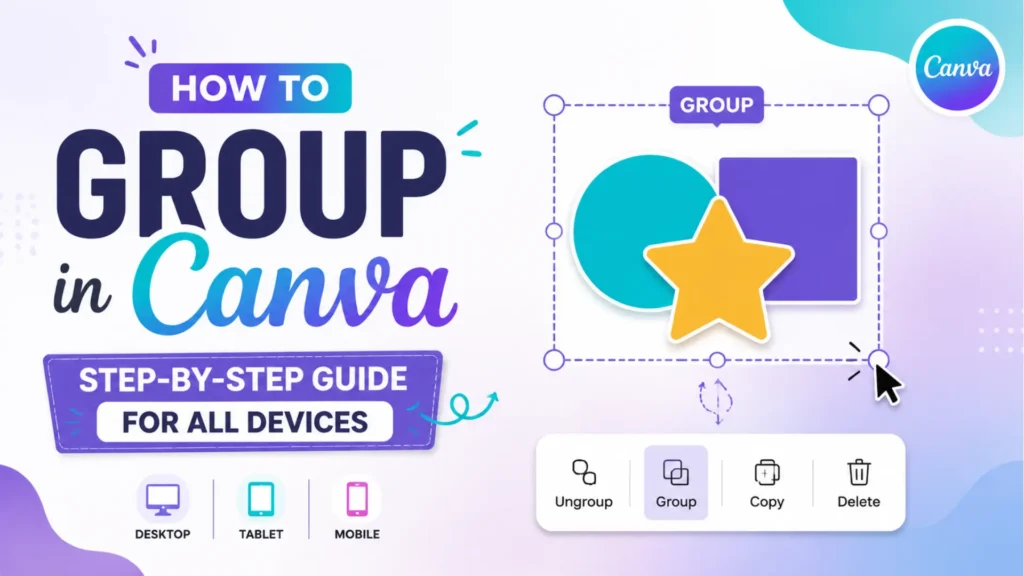
Have you ever found yourself frustrated while trying to align multiple elements in Canva, only to end up wasting time moving things one by one? Whether you’re designing a social media post, presentation, or print material, manually adjusting each element can be tedious and inefficient. Knowing how to group in Canva is the solution that can save you time and make your design process much smoother. By grouping elements together, you can move, resize, and align multiple objects at once, ensuring a more streamlined workflow. In this complete guide, we’ll walk you through exactly how to group in Canva, providing step-by-step instructions for different devices like Canva Mobile, iPad, iPhone, and Desktop. Plus, we’ll tackle common issues you might encounter and offer practical solutions to make the grouping process even easier.
What Does Grouping in Canva Mean and Why Is It Important?
Grouping in Canva refers to combining multiple design elements such as text, images, and shapes into a single object for easier manipulation. This feature is useful when you want to move, resize, or align multiple elements at once without affecting individual components.
Why Grouping in Canva is Crucial for Your Design Workflow:
- Efficiency: Grouping elements lets you adjust multiple objects at once instead of individually.
- Organization: Helps keep your design neat and organized, especially when working with complex layouts.
- Consistency: Ensure uniformity by keeping elements aligned and proportioned when resizing or moving.
- Time-Saving: Grouping significantly reduces the time spent editing large or complex designs.
Grouping is especially important when working on designs for social media, presentations, and flyers where you need quick adjustments across various elements.
How to Group Elements in Canva: A Step-by-Step Guide
Now that you understand the importance of grouping, let’s walk through how to group elements in Canva across different devices, including mobile, desktop, and iPad.
1. How to Group Text in Canva (Mobile, Desktop, iPad)
Grouping text in Canva Mobile and on desktop works similarly. Here’s how you can group text elements:
- Mobile (iPhone & iPad):
- Tap to select the first text element you want to group.
- Tap and hold on the text box, then select other text elements by tapping on them.
- Once all elements are selected, tap the “Group” option from the toolbar at the top of the screen.
- Tap to select the first text element you want to group.
- Desktop (Canva Web Version):
- Hold down Shift and click on each text box you want to group.
- After selecting all the text elements, right-click and choose Group, or simply use the keyboard shortcut Ctrl + G (Windows) or Cmd + G (Mac).
- Your text boxes are now grouped together, allowing you to move and resize them as one.
- Hold down Shift and click on each text box you want to group.
2. How to Group in Canva Using Keyboard Shortcuts (Desktop)
If you’re using Canva on a desktop or laptop, keyboard shortcuts make grouping even faster:
- To Group: Press Ctrl + G (Windows) or Cmd + G (Mac).
- To Ungroup: Press Ctrl + Shift + G (Windows) or Cmd + Shift + G (Mac).
Using these shortcuts speeds up your workflow when designing on desktop, especially if you are working with multiple elements at once.
3. How to Group Elements in Canva on iPad
Grouping in Canva on an iPad is simple. Follow these steps:
- Tap to select the first element.
- Tap the next elements while holding the first selected element to add them to the group.
- Once all desired elements are selected, tap the “Group” button in the toolbar.
You can also use Canva iPad keyboard shortcuts (if available) for a more streamlined design process.
4. How to Group in Canva on iPhone (Mobile)
To group elements in Canva on iPhone, follow these easy steps:
- Select the elements you want to group by tapping on them while holding the Shift key.
- Once all elements are selected, tap the “Group” button located in the top toolbar.
Grouping on Canva mobile makes it easier to manage designs on the go, especially when creating posts for social media or quick edits.
How to See Layers in Canva Mobile:
Layers in Canva help you manage the stacking order of elements in your design. While Canva Desktop provides a straightforward way to view layers, viewing layers on Canva Mobile (iPhone/iPad) requires a bit of a workaround.
- For Canva Mobile: Layers are not as directly visible as in the desktop version. To see the layers:
- Tap on the element you want to inspect.
- Use the Send Forward or Send Backward options in the toolbar to move your element forward or backward in the layer stack.
- You can also use the Position option to adjust where your elements sit in relation to each other.
- Tap on the element you want to inspect.
Canva is constantly evolving, so it’s always a good idea to check for updates that may make layer management more intuitive on mobile.
Troubleshooting: Why Can’t I Group in Canva?
There are times when you might face issues with grouping in Canva. If you’re wondering, “Why can’t I group in Canva?”, here are some common reasons and solutions:
1. Locked Elements
If any of the elements you are trying to group are locked, grouping will not work. To fix this:
- Unlock Elements: Right-click on the locked element and select Unlock to make it editable.
2. Different Element Types
You can only group compatible element types. For example, you might encounter an issue when trying to group a photo with a text box or a vector shape.
- Solution: Ensure you’re grouping similar elements, like all text boxes or all images.
3. Hidden Layers
Sometimes, an element might be hidden behind others, making it difficult to select for grouping.
- Solution: Bring the hidden element to the front by selecting it and using the Position feature to bring it forward.
4. Canvas Size
If you have a very large or very small canvas, some elements may be out of the selection area.
- Solution: Zoom out or adjust your canvas size to make sure all elements are visible and within reach for grouping.
Grouping vs. Layering in Canva: What’s the Difference?
layering and Grouping are two techniques in Canva that help you manage your design elements, but they serve different purposes:
Grouping:
- Combines multiple elements (such as text, images, shapes) into a single unit.
- Ideal for resizing, moving, or aligning several objects at once.
- Useful when you need consistency across a group of elements (e.g., logos, headers, images).
Layering:
- Refers to the stacking order of elements on your canvas (e.g., bringing an image forward or sending it to the back).
- Essential for managing the visual depth of objects in your design.
- Perfect for creating effects like text over images or layering backgrounds.
Both grouping and layering can be used together for a polished, organized design.
How to Group Elements in Canva 2026 (Future Trends)
While grouping elements in Canva remains largely the same, it’s likely that Canva’s interface will evolve further in 2026. As of now, Canva continuously improves its mobile and desktop features, and future updates could introduce more advanced grouping options. Here are some possible trends:
- Enhanced Grouping Options: Canva could introduce more flexible grouping tools, such as grouping across pages or more detailed control over grouped items.
- Smarter Grouping Suggestions: AI-powered grouping could suggest groupings based on common design practices or similar elements.
- More Robust Layer Management: Future Canva updates may offer better visibility and control over layers, even on mobile platforms.
For now, knowing how to group and manage your elements effectively is key to maximizing your Canva experience.
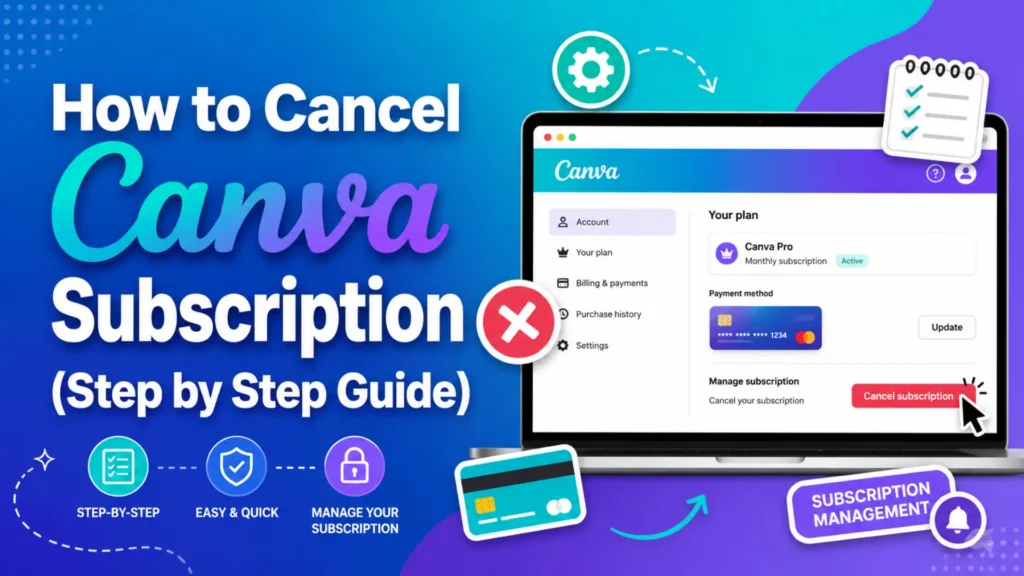
How to Cancel Your Canva Subscription
If you’re looking to cancel your Canva subscription, the process is straightforward. Simply follow these easy steps:
- Log in to your Canva account.
- Click on your profile icon and select Account Settings.
- Scroll down to the Billing & Plans section.
- Click on Cancel Subscription and follow the prompts.
For more detailed instructions, feel free to check out this guide on How to Cancel Your Canva Subscription.
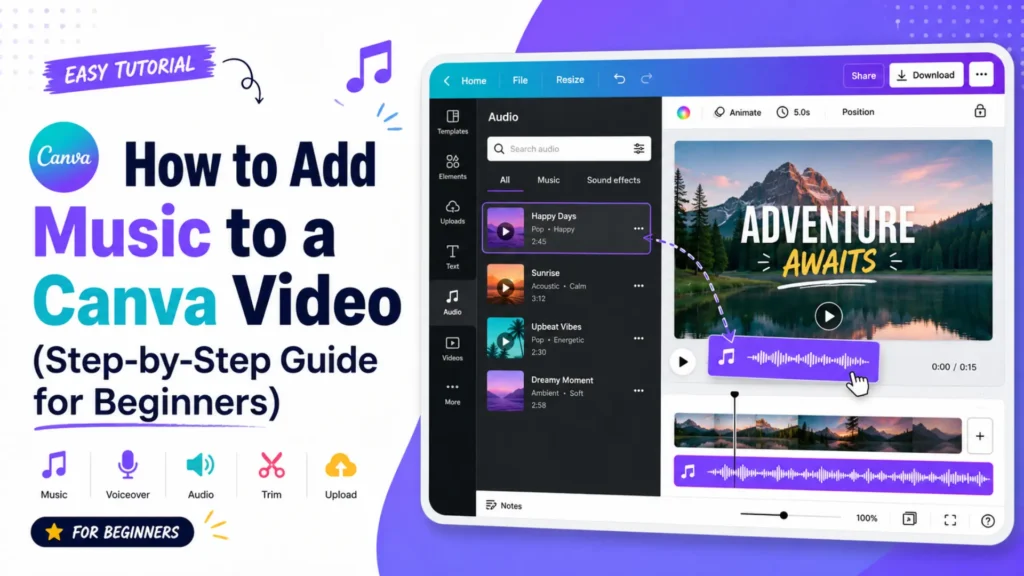
How to Add a Music Video to Canva
Want to add a music video to your Canva design? It’s easier than you think! To add music:
- Open your design in Canva.
- Click on the Uploads tab and upload your video file or select a stock video.
- Once uploaded, drag and drop the video onto your design.
- You can also add background music by navigating to the Audio tab and selecting a track to add to your design.
For detailed steps, you can refer to our article on How to Add a Music Video to Canva for more tips.
FAQs About Grouping in Canva
1. Can I group elements across different pages in Canva?
No, you can only group elements within a single page. If you need the same group on different pages, you’ll have to duplicate the group manually on each page.
2. Is there a limit to how many elements I can group in Canva?
There’s no strict limit on the number of elements you can group, but grouping too many can make your design difficult to manage. It’s best to group in smaller, organized sections for easier handling.
3. Can I group elements in Canva without selecting them individually?
Unfortunately, you need to manually select each element by holding down the Shift key or tapping them. Canva doesn’t allow you to auto-select multiple elements for grouping.
4. How do I adjust the position of a grouped element in Canva?
After grouping, select the group and use the Position tool to align it on the canvas. This tool lets you center, move forward/backward, or align with other elements for precision.
5. Can I group elements in Canva on the web version and mobile app at the same time?
No, changes made in the web version or mobile app don’t sync automatically. You’ll need to group elements separately on each platform.
Conclusion: Mastering Grouping in Canva for a Streamlined Workflow
Knowing how to group in Canva is essential for any designer, whether you’re working on social media graphics, flyers, or presentations. Grouping elements together allows you to maintain consistency, save time, and keep your designs organized. Whether you’re using Canva Mobile, iPad, or Desktop, the grouping process remains simple and efficient with the steps provided above. By incorporating these techniques and using keyboard shortcuts, you’ll optimize your design workflow. Don’t forget to troubleshoot common issues like locked elements or incompatible types to ensure smooth grouping. With practice, grouping in Canva will become second nature, and you’ll be able to create polished, professional designs faster than ever.